
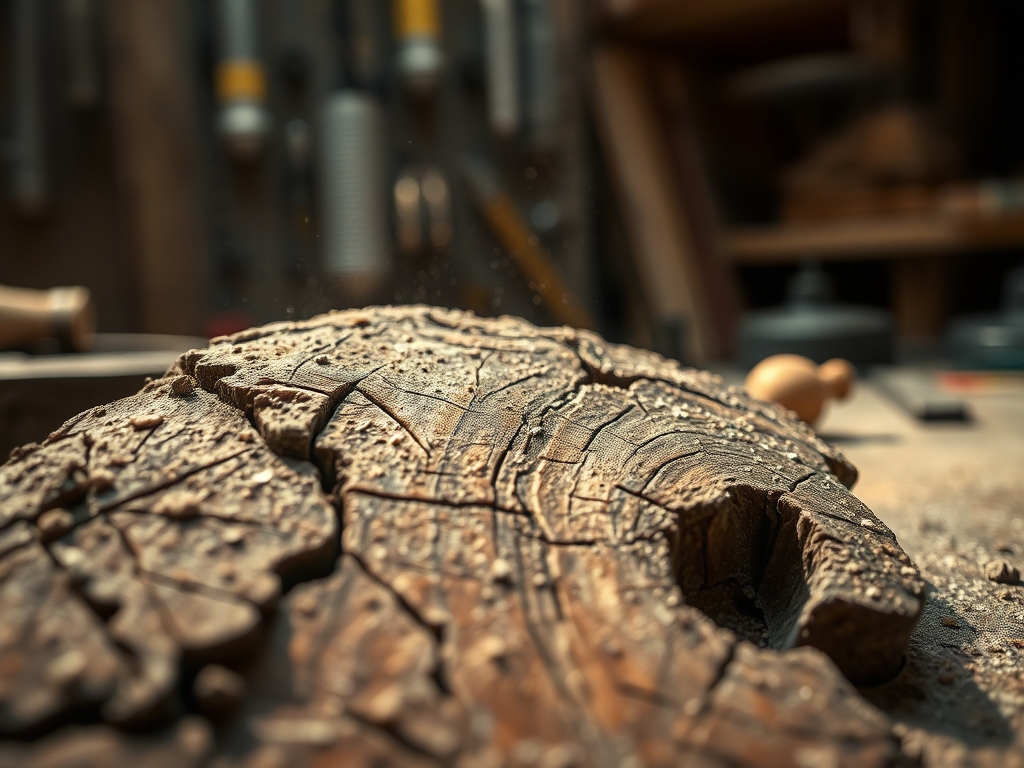
Imagine the smell of fresh cedar shavings hitting the floor as you lean into your workbench. There is a specific, electric thrill that comes from taking a perfectly flat, industrial board and transforming it into something that looks like it was pulled from a centuries old cottage. We are diving deep into Advanced Wood Texture Work today because we want that soul stirring, hand hewn aesthetic that screams craftsmanship. It is not just about making a mess; it is about the physics of the fiber. When you press a sharp gouge into the wood, you are negotiating with the cellular structure of the tree. You can feel the resistance of the latewood as your blade glides through the softer earlywood. This process is visceral and rhythmic. We are going to bypass the sterile look of machine sanded surfaces and embrace the beautiful, undulating topography of a truly hand carved piece. Grab your favorite apron and let us get into the grit of it.
THE STUDIO KIT
THE STUDIO KIT
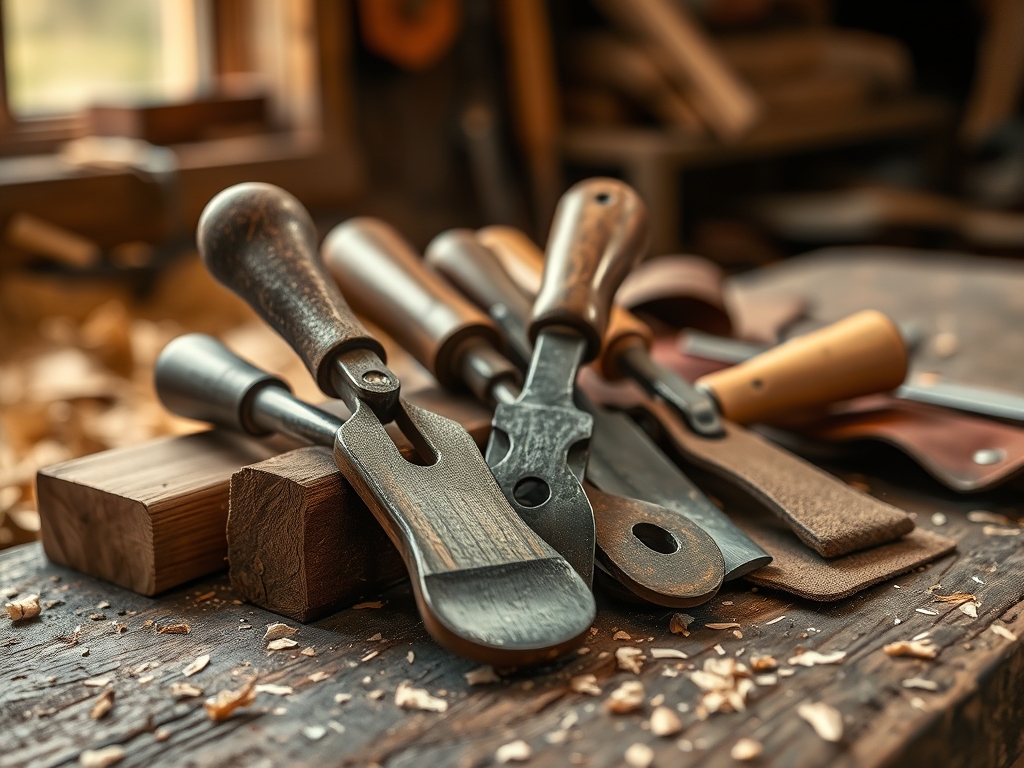
To achieve professional results, your kit must prioritize edge retention and ergonomic control. Your primary tool is the out-cannel carving gouge, specifically a number five or number seven sweep. The sweep refers to the curvature of the blade; a higher number means a deeper "U" shape, which creates more dramatic shadows in your texture. You will also need a honing strop loaded with chromium oxide paste to maintain a razor sharp edge. Without a polished edge, you will crush the wood fibers rather than slicing them, leading to a fuzzy, low quality finish.
For measuring and layout, keep a pair of steel calipers and a marking awl nearby. The calipers help you monitor the thickness of the board to ensure you do not carve too deep and compromise the structural integrity of the piece. If you are working with harder species like white oak, you might also want an oscillating tool with a carving attachment to rough out the bulk of the material before finishing with hand tools.
Material Substitutions: If you cannot find premium hardwoods like walnut or cherry, reach for recycled Douglas fir. It has a high density of resinous latewood which provides incredible tactile feedback when carved. For a sustainable twist, try Paulownia wood; it is incredibly lightweight with a low specific gravity, making it a dream for high speed texturing.
THE TEMPO
The "Maker's Rhythm" is the secret sauce to a consistent hand hewn look. You cannot rush the physics of wood grain. Expect to spend about twenty minutes on the Prep Phase, which involves securing your workpiece and marking your grain direction. The Execution Phase is where the bulk of the time lies; for a standard tabletop, plan for four to six hours of active carving. This is broken down into twenty minute "sprints" followed by five minutes of tool honing. Finally, the Refining Phase takes about an hour, where you burnish the ridges to give them a soft, lived in feel. This tempo prevents muscle fatigue and keeps your cuts crisp.
THE CORE METHOD
1. Mapping the Grain Topography
Before your blade touches the wood, you must map the grain using your marking awl. Wood is a bundle of microscopic straws held together by lignin. If you carve against the grain, the blade will dive too deep and tear the fibers. Always carve in the direction the grain is "running out" to ensure a clean shear.
Mastery Tip: This is all about tensile strength. When you carve with the grain, you are utilizing the longitudinal strength of the wood fibers. Carving against it causes the fibers to splinter because their transverse strength is significantly lower.
2. The Shallow Entry Stroke
Start with your gouge at a low angle, nearly parallel to the wood surface. Use a "flicking" motion from your wrist rather than pushing with your shoulder. This creates a shallow, almond shaped scallop. Observe the alignment in the step-by-step photos below to see how the scallops should slightly overlap.
Mastery Tip: By controlling the entry angle, you manage the capillary action of the wood. A shallow cut leaves the vascular bundles intact at the base of the scallop, which prevents the wood from soaking up too much finish later and becoming blotchy.
3. Randomizing the Facets
To get that authentic hand hewn look, you must avoid perfect rows. Vary the length and depth of your strokes. Think of it like ripples on water. Some should be long and thin, while others are short and deep. This creates a complex interplay of light and shadow across the surface.
Mastery Tip: Varying the depths prevents structural resonance. If all your cuts were the same depth and frequency, you could inadvertently create weak points in the wood ply that might lead to warping or cracking under stress.
4. Burnishing the Ridges
Once the carving is complete, do not reach for the sandpaper! Sanding will dull the crisp edges of your gouge marks. Instead, use a bone folder or a smooth piece of hardwood to burnish the high ridges of the texture. This compresses the fibers and creates a natural luster.
Mastery Tip: Burnishing increases the surface density of the wood. By mechanically compressing the cells, you make the surface more resistant to moisture and wear without the need for heavy chemical sealants.
THE TECHNICAL LEDGER
Maintenance & Longevity: Keep your gouges in a tool roll made of oil tanned leather. This prevents moisture from reaching the high carbon steel and causing oxidation. Every six months, apply a thin coat of camellia oil to the metal surfaces.
Material Variations:
- Premium: Black Walnut offers the best "crispness" for detail work.
- Sustainable: Reclaimed barn wood adds instant character but watch for hidden nails.
- Recycled: Pallet wood can be used, but it is often kiln dried to the point of brittleness; use a damp sponge to hydrate the surface before carving.
The Correction:
- The Tear Out: If you rip a chunk of wood out, do not panic. Use a jeweler's saw to cut a small "Dutchman" patch from a scrap of the same board and glue it in, matching the grain.
- The Dull Blade: If the wood looks "fuzzy," your gouge is dull. Stop immediately and return to the honing strop. A dull blade is a dangerous blade.
- The Deep Gouge: If you go too deep, blend the surrounding area into a wider, shallower depression. This makes the "mistake" look like a natural feature of the wood.
Studio Organization: Store your textured pieces horizontally in a climate controlled environment. Vertical storage can lead to bowing, especially after you have removed significant material from one side of the board.
THE FINAL REVEAL
Step back and look at that surface! The way the light catches those hand carved facets is something no factory machine could ever replicate. It feels rugged yet sophisticated; a perfect marriage of raw nature and technical skill. Your piece now has a "voice" and a history that you created stroke by stroke. This hand hewn texture will age beautifully, gathering a patina in the valleys of the carvings that will only look better with time. You have officially mastered the art of making the new look timeless.
STUDIO QUESTIONS
How do I stop my hand from cramping?
Maintain an ergonomic grip by holding the gouge like a flute, not a hammer. Use your non dominant hand to guide the blade tip while your dominant hand provides the forward momentum. Relax your shoulders and breathe with each stroke.
Can I use this technique on plywood?
No, plywood consists of thin ply layers with alternating grain directions. Carving into it will reveal the glue lines and cause the thin veneers to splinter and delaminate. Stick to solid lumber for the best results.
What finish works best for textured wood?
A high quality penetrating oil or wax is best. Avoid thick film finishes like polyurethane, as they will pool in the carved valleys and obscure the beautiful tactile details you worked so hard to create.
How sharp does the gouge really need to be?
It should be "scary sharp." If the blade cannot effortlessly shave the hair off your arm, it is not ready for Advanced Wood Texture Work. A sharp blade ensures clean cellular shearing and a polished finish.

